Color palette of Matisse works for graphic design / Paleta de colores según las obras de Matisse para diseño gráfico

•noviembre 4, 2012 • Deja un comentario

Extraída de las obras de Matisse, nos dá una gama de colores que se asemejan al resultado en la sobras del artista. El trabajaba con colores primarios y complementarios puros, y es la mezcla la que da tonos tan específicos. Como la mezcla con programas de diseño no tiene la calidad y textura obtenidas al mezclar óleo en la realidad, es bueno crear para nuestras obras un muestrario con los colores finales de Matisse para trabajar, que nos valga de guía.

Extracted from the works of Matisse, gives us a range of colors that are similar to the result in the artist’s leftovers. He worked with pure primary and complementary colors, and the mixture is what gives such specific tones. As the mixture design programs do not have the quality and texture obtained by mixing oil in reality, it is good to create a showcase for our work with the final colors  from Matisse work, useful as a guide.

Color carne/skin colour  (Values in CMYK)

Hay una gran gama de tonos para la piel en las obras de Matisse./ There is a wide range of skin tones for the works of Matisse

cmyk 4,74,78,1

cmyk 5,46,60,0

cmyk 4,35,54,0

cmyk 13,25,85,0

cmyk 0,39,59,0

cmyk 10,47,61,0

Rojos/reds

cmyk 21,99,99,14

cmyk 16,93,100,6

cmyk 2,94,100,1

Verdes /Greens

cmyk 54,16,93,1

cmyk 73,36,93,22

Azules /Blues

cmyk 83,75,0,0

cmyk 68,54,0,0

Violeta /violet

cmyk 47,93,32,13

Blancos /whites

cmyk 13,0,8,0    

El blanco de Matisse está matizado con los colores de alrededor. Se puede matizar hacia el azul, el verde o el rojo. The Matisse is white tinged with the colors around. You can refine towards blue, green or red.

Negros/ blacks

Los negros también está matizado. Algunos de ellos: Blacks also are nuanced. Some of them:

cmyk 83,63,76,79

cmyk 94,100,42,56

cmyk 71, 76, 77, 89

cmyk 74,67, 67, 73

Tras hacer este tutorial descubrí este blog donde exponen la paleta de pinturas de algunas obras. Puede ser interesante echarle un vistazo.

After doing this tutorial I found this blog where exposed paintings palette of some works. It may be interesting to take a look.

http://www.colourlovers.com/blog/2007/06/20/color-inspiration-from-the-masters-of-painting/

Sobre los colores utilizados por Matisse, encontré esta reseña:

“La paleta de Matisse está formada por nueve colores situados por medio de un “marco” de naranja cadmio. (…) el autor de limitó a unos pocos primarios: azul cobalto, rojo profundo, amarillo de cadmio cálido, blanco y negro a los que unió otros cinco complementarios.” Técnicas de los Artistas Modernos. Judith Collins,John Welchman. Editorial  Tursen. Hermann Blume . 1996

About the colors used by Matisse, I found this review:

«Matisse’s palette consists of nine colors placed by a» framework «cadmium orange. (…) The author’s limited to a few primary: cobalt blue, deep red, warm cadmium yellow, white and black to those who joined five other complementary. «Techniques of Modern Artists. Judith Collins, John Welchman. Editorial Tursen. Hermann Blume. 1996

http://books.google.es/books?id=3D0sNjiqHIEC&pg=PA130&lpg=PA130&dq=paleta+de+colores+de+matisse&source=bl&ots=XtHZDIwWkJ&sig=pnGvNRVBMa1wSlQsR2Y7O9M8hjw&hl=es#v=onepage&q=paleta%20de%20colores%20de%20matisse&f=false

Tutorial «pintar como Matisse». «Painting like Matisse» tutorial

•octubre 29, 2012 • Deja un comentario

Basado en un tutorial del Especial Arte y diseño por ordenador, Adobe Photoshop guía completa nº 14.

Matisse es uno de los representantes del fauvismo, movimiento artístico de las primeras vanguardias del siglo XX. Pintar como los fauvistas confiere color y brillantez a las obras. Lo importante es que el color se usa para modelar las formas, los claroscuros y a su vez transmite emociones.

Los consejos previos es ajustar los pinceles bien, usar las opciones de textura y cierta espontaneidad en las pinceladas.

Imagen previa: conviene estudiar las obras de Matisse para buscar un encuadre interesante. Nosotros partiremos de un retrato.

La paleta de colores se ha extraído de obras de esta Web: http://the-inner-art.blogspot.com.es/2011/10/poesia-en-los-colores-de-henri-matisse.html. Sobre como crear la paleta: https://silenechristen.wordpress.com/2012/11/04/color-palette-of-matisse-works-for-graphic-design-paleta-de-colores-segun-las-obras-de-matisse-para-diseno-grafico/ 

Pasos:

1. Conviene preparar la imagen antes simplificando los tonos, los colores. Para ello se duplica y utilizamos capas de ajuste de curvas, niveles, etc.

2. Creamos una nueva capa con blanco y opacidad de 40 % sobre las demás.

3. Pintamos en un azul oscuro los contornos de la imagen (realizamos el dibujo). Según las zonas el pincel puede ser más o menos grueso. Pintamos también las sombras con pinceladas más gruesas. Con diámetro menor del pincel se realizan detalles menores: por Ej. en un retrato perfiles, cejas, etc.

4. Ahora vienen dos posibilidades: o en la misma capa, mezclando los colores con modo fusión trama, o usar pincel histórico, etc… o en capa diferente. En el tutorial crea capa diferente para dar los colores básicos, en una capa superior nueva damos las zonas cromáticas extensas, con pinceladas dispares y sueltas.

5. Definiendo la luz. Damos pinceladas vivas, direccionales, sueltas y más largas. Colores más claros.

6. Definiendo sombras. Con el verde definimos las zonas de sombras. Las pinceladas cortas. Ir ajustando el tono.

7. Los rojos, en una capa nueva. Es un color importante en los cuadros de Matisse. Elegir uno brillante y dar pinceladas sueltas y libres. Usarlo para definir cara y cuello (en retratos).

8. Definir. Los detalles se definen con opacidad del 80% y colores más oscuros. Dar forma al pelo, por Ej. , en un retrato.

9. Pinceladas suaves. Usar la herramienta dedo con las opciones “muestrear todas las capas” y “pintar como dedos”.  Diámetro de pincel pequeño. Dará toques de color verde en diversas zonas.

10. Con herramienta pincel de nuevo, se dan colores de cian brillante en pelo, alrededor de ojos, etc.

  1. Iluminaciones. En una nueva capa pintar con blanco las zonas más iluminadas. Detalles finales.
  2. Detalles finales con pinceladas cortas, recordar de “romper” los contornos.
  3. Textura IMPASTO. Es la que da la sensación de óleo.  Primero acoplamos todas las capas (no las fotos originales) y las acoplamos. Copiamos esta capa resultante y:

–          Imagen – ajustes – desaturar

–          Imagen – ajustes – invertir.  Modo fusión superponer

–          Filtro – estilizar-relieve. Altura 2 -3 pixeles  y cantidad 500 aprox.

–          Ajustar la opacidad según interese.

Based on a special tutorial Computer Art and Design, Adobe Photoshop Complete Guide No. 14.

Matisse is one of the representatives of Fauvism art movement of the early twentieth century avant-garde. Fauvist painting as colour and brightness gives the works. The important thing is that the colour is used to model the shapes, the light and darks, and in turn transmits emotions.

The previous advice is to adjust the brush well, using texture options and some spontaneity in the brushstrokes.

Previous image: should study the works of Matisse to search for interesting frame. We start from a portrait.

The colour palette is drawn from works of this website: http://the-inner-art.blogspot.com.es/2011/10/poesia-en-los-colores-de-henri-matisse.html. About how to creat the pallette of colours https://silenechristen.wordpress.com/2012/11/04/color-palette-of-matisse-works-for-graphic-design-paleta-de-colores-segun-las-obras-de-matisse-para-diseno-grafico/

Steps:

Should prepare before simplifying image tones, colours. This doubles and use curve fitting layers, levels, etc…
Create a new layer with white and opacity of 40% on the other.
We painted in dark blue contours of the image (make the drawing). According to the brush area may be more or less thick. We painted the shadows with touches also thicker. With smaller diameter of the brush are made minor details: for example in a portrait profiles, eyebrows, etc…
Now come two possibilities: either in the same layer, mixing colours with frame blending mode, or use history brush, etc… or in different layer. In the tutorial creates separate layer to give the basic colours in a new topcoat colour give extensive areas with loose brushstrokes and disparate.
Defining light. We live brushstrokes, directional, and longer loose. Lighter colours.
Defining shadows. With the green define the shadows. The short strokes. Go adjusting tone.
The Reds, on a new layer. It is an important colour in Matisse’s paintings. Choose a bright and give free and loose brushstrokes. Use it to define the face and neck (in portraits).
Define. The details are set to 80% opacity and darker colours. Shaping the Hair, for example, in a portrait.
Soft brushstrokes. Use the smudge tool with the «sample all layers» and «paint like fingers.» Small brush diameter. Give hints of green in various areas.
With brush tool again, there are bright colours cyan hair, around eyes, etc.
Illuminations. In new layer paint with white highlight areas. Final details.
Final details with short strokes, remember to «break» the contours.
IMPASTO texture. It gives the feeling of oil. First slaved all layers (not original photos) and merge it. We copied this layer and resulting:
– Image – adjustments – desaturate

– Image – Adjustments – invert. Fusion mode overlap

– Filter – Stylize-Emboss. Height 2 -3 pixels and quantity 500 approx.

– Adjust the opacity as interested.

ROPA PARA SECOND LIFE DESDE CERO/STARTING CLOTH FOR SECOND LIFE

•enero 3, 2010 • 4 comentarios

He estado subiendo al blog tutoriales sobre ropa avanzados, al considerar que ya había tutoriales de ropa en la web básicos.  Como mucha gente quiere empezar y se ve dirigida a esta web, he considerado interesante un artículo desde cero, que permita enganchar posteriormente a los  tutoriales avanzados.

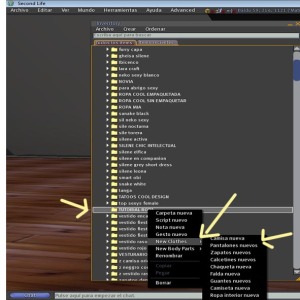
Debemos tener en cuenta cómo se crea la ropa en Second Life, para comprender el proceso posterior de realizar las texturas. La ropa en Second Life se realiza o directamente en inventario dado con el boton derecho a «crear ropa» o mediante el proceso de editar al avatar. Una vez editado, retiramos la ropa que tengamos y damos a crear una nueva. Si la hubieramos creado en inventario con «poner» la ropa es igual proceso. La ropa asi creada por defecto viene en color blanco y textura blanca.

I’ve been climbing the blog tutorials on advanced clothing, considering that clothing had tutorials in the basic web. Like many people want to start and is directed to this website, I considered interesting an article from scratch, allowing then to engage the advanced tutorials.

We must consider how to create clothes in Second Life, to understand the process after making textures. Clothes in Second Life is made or given inventory directly into the right button to «create clothes» or through the process of editing the avatar. Once edited, remove clothes that have and give to create a new one. If we had created in inventory to «put» clothes is equal process. The clothing is created by default so white and white texture.
La manera sencilla a partir de aqui es elegir cualquier textura y, estando el avatar en modo editar apariencia, arrastramos la textura del inventario a la venta correspondiente de tejido, elegida la prenda en la seleccion a la izquierda de la ventana de edición. Tambíen podemos entonces cambiar el color.

The easy way from here is to choose any texture and, when the avatar appearance in edit mode, drag the texture of the inventory for the sale of fabric, the garment chosen in the selection to the left of the edit window. Also we can then change the color.

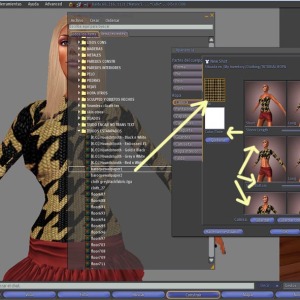
Truco: lo del color tiene la siguiente utilidad: en ocasiones con subir las textuas en color blanco, o elegir texturas blancas, obtenemos diferentes modelos.

Una vez ajustamos los parámetros de cada prenda en modo editar apariencia ( largo, cuello, etc..) guardamos la prenda con el nombre escogido.

¿Por qué pues el tema de hacer ropa para SL es tan complejo? Con  la cantidad de diseñadores de moda en SL se impone elaborar ropa de más calidad: arrugas, tirantes, transparencias, etc. Se busca mayor realismo y calidad en diseño. Aunque se complementa la ropa con accsorios externos: cuellos sculpted , mangas prims flexibles… La ropa de verdadera calidad utiliza estos prims anexados (attached) al avatar como complemento, no como elementos básicos. Aqui es donde entra el realizar las texturas con algun programa de sideño grafico, generalmente el photoshop. Estas texturas se suben a SL en formato TAG ( si precisan canales alfa que ahora veremos que son) y si no, en JPEG o PNG.

Hint: what color is the following utility: sometimes to climb the textured white or white textures to choose, we get different models.

Once we adjust the parameters of each garment in edit mode look (long, neck, etc. ..) keep the garment with the name you choose.

Why then the issue of making clothes for SL is so complex? With the number of fashion designers in SL is necessary to develop higher-quality clothing wrinkles, straps, slides, etc.. It seeks greater realism and quality in design. Although clothing is complemented with external accsorios: sculpted collars, sleeves, flexible prims … The true quality clothing using these prims attached (attached) to the avatar as a complement, not basics. Here is where the textures do with some graphic siden program, usually the photoshop. These textures are uploaded to SL TAG format (if needed we will now see alpha channels that they are) and if not, in JPEG or PNG.

Plantilla de ropa/Template clothes

Una vez decidimos dar un paso más y realizar nosotros las texturas, necesitamos trabajar con plantillas. Estas plantillas son utiles para hacer: skins, ropa, tatuajes, etc. Hay varios sitios donde pueden conseguirse (incluida la propia web de linden), pero si las quereis ya en formato psd, con sus capas separadas y todo, lo mejor es ir a la web

Once we decided to go a step further and make the textures we need to work with templates. These templates are useful for: skins, clothing, tattoos, etc.. There are several places to get (including linden own website) but if you want and psd format, with separate layers and all, it’s best to go to the web

http://www.robinwood.com/Catalog/Technical/SL-Tuts/SLPages/AVUVTemplates.html

donde las teneis en formato psd directamente. Veamos qué plantilla utilizaremos para cada tipo de prenda:

where you have in PSD format directly. Let’s see what templates used for each type of garment:

Camisas  y camisetas mujer                         Top template

Camisas y camisetas hombre                     Top template.  Pero con esta plantilla a la shape del hombre le queda cortísima por lo que se añade una parte inferior de la camisa o camiseta de otra plantilla (o falda o pantalon, es decir bottom template). A la hora de crear esta ropa en SL, la parte inferior de la camisa o camiseta se añade como ropa interior, como pantalon y si está en forma chaqueta se usa la textura para la aprte inferior de ésta.

Pantalones, faldas, ropa interior, tatuajes piernas, calcetines             Bottom template y Skirt template.

women’s shirts                                                                 Top  template

man shirts                                                                            Top   template. But with this template to the shape of man is very short so it is added to a bottom of the shirt or jersey of another template (or skirt or trousers, ie bottom template). When creating these clothes in SL, the bottom of the shirt or jersey is added as underwear as pants and jacket if it is used as texture for the bottom of this part.

Pants, skirts, lingerie, tattoos, legs, socks                    Bottom and Skirt template.

* Ojo, mientras en el Top template tenemos a la izquiera la parte frontal del cuerpo, en la Bottom template o Skirt template la parte frontal del cuerpo la tenemos a la derecha. Llevar cuidado o nos costará alguna textura mal hecha. 🙂

* Hint, while we have the Top template to the left front of the body in the Bottom Skirt template template or the front of the body we have it right. Take care or it will cost us some shoddy texture. 🙂

Para que lo comprendamos. Quiero hacer una camiseta de tirantes de chica de verano. Realizo mi textura en una Top template. Acto seguido la subo a Second Life. Pongo en modo editar apariencia al avatar y puedo crear varias prendas con esta textura: camiseta, camisa y chaqueta. En definitiva se verán como camiseta de tirantes en SL. ¿Porque la ropa que nos vende viene con varias prendas para el mismo resultado? para dar la opción de usar tatuajes debajo de la camiseta, por ej, o tops de bikinis, etc. En ese caso la camisa se la pondría el avatar como chaqueta, el top del bikini como camisa y el tatuaje como camiseta. Visualmente el efecto es el buscado.

For that we understand. I have a girl’s tank top in summer. I make my texture in a Top template. Then the climb to Second Life. I put in edit mode and look at the avatar I create several pieces with this texture: undershirt, shirt and jacket. Ultimately they will be like tank top in SL. Why are the clothes we sell comes with several pieces to the same result? to give the option of using tattoos under her shirt, for example, or bikini tops, etc.. In that case, the shirt would be the avatar as the jacket, the bikini top as a shirt and tattoo like t-shirt. Visually the effect is sought.

Ahora supongamos que queremos hacer la misma camiseta de tirantes para hombre. Como hemos dicho en el hombre se precisa un añadido o queda ridícula. Usamos la Top template para la parte superior de la camiseta y añadimos una parte inferior con la Bottom template o Skirt template. Una vez subidas las dos  texturas a Second Life creamos también tres prendas con igual textura: camisa y camiseta, y la chaqueta donde añadimos a la textura de la parte inferior la segunda textura. Nos encontramos que si el avatar usa la prenda en modo chaqueta, la camisa se verá completa y perfecta, pero ¿y si la usa en modo camisa o camiseta? para ello hemos creado una ropa interior y unos pantalones con la textura de la parte inferior de la camiseta. A la hora de vestirse el avatar deberá jugar con todas estas prendas. Por ejemplo, quiere llevar pantalones tejanos, tatuaje y camiseta. Se colocaría los tejanos como pantalones, tatuaje como camiseta, y en forma chaqueta la camiseta que realizamos. En algunos casos los diseñadores incluyen una opcion de textura de pantalon con parte inferior de camiseta encima para el siguiente supuesto: Ahora el avatar quiere llevar una cazadora (prenda la chaqueta) abierta, y que se vea la camiseta por fuera del pantalón tejano y el tatuaje por el torso y cuello (prendas: camisa para camiseta, camiseta para tatuaje y el pantalón debe llevar la parte inferior de la camiseta en la misma textura del pantalon vaquero, con lo que con la prenda pantalón veríamos el pantalón vaquero y el final de la camiseta.

Now suppose we want to do the same tank top for men. As noted in man is required is added or ridiculous. Top We use the template to the top of the shirt and add a bottom with Bottom Skirt template or template. Once uploaded the two textures to Second Life also created three pieces with the same texture shirt and shirt, and jacket which add to the texture of the bottom, the second texture. We find that if the avatar mode uses the garment jacket, shirt will be perfect and complete, but what if the mode used shirt or shirt? So we’ve created an underwear and pants with the texture of the bottom of the shirt. A time to dress the avatar must play with all these clothes. For example, want to bring jeans, tattoos and clothing. Texans would be placed as pants, tattoo like t-shirt, jacket and shirt as we do. In some cases designers include a choice of textured bottom trousers with shirt over to the next course: Now the avatar wants to wear a jacket (jacket garment) open, and be seen outside of the shirt and jeans tattoo on the torso and neck (clothes: shirt, shirts, tattoo shirts and pants should bring the bottom of the shirt in the very texture of the jeans, the pants garment that would see the jeans and end of shirt.

Creo que con este resumen de qué queremos que se observe, y con qué prendas lo lograremos, disponemos de una buena guía para saber qué texturas realizar.

I think with this summary of what we want to observe, and what clothes we will, have a good guide to what textures do.

Realizando una prenda en concreto: camiseta semitransparente. Making a sample garment: semi-transparent shirt.

Como podemos apreciar en la foto, abrimos la plantilla de la parte superior/ top template, que nos viene en formato PSD, con capas, para photoshop. Creamos una capa inferior al resto que coloreamos (en mi caso de blanco para visualizar todo mejor).  Realizamos una selección de por donde queremos que vayan escote , mangas, etc en la camiseta. (Aconsejo en este punto mirar el artículo donde comento la posibilidad de crear ropa con esta textura del patrón o template inworld , en el mismo SL, para visualizar dónde quedará exactamente cada línea o corte cuando la vistamos en el avatar).

As we see in the picture, open the template in the upper / top template, which comes in PSD format with layers for photoshop. Create a layer below the rest of that color (in my case blank to display all the better). We carry a selection of where we want to go neckline, sleeves, etc on the shirt. (I recommend at this point look at the article which discusses the possibility of creating clothes with this template pattern or texture inworld at the same SL, to see where each line will be exactly when dressing the avatar).
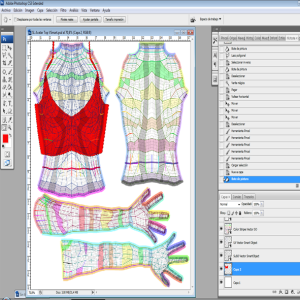
En la foto he coloreado de rojo la selección para apreciar ésta. Es muy importante quiarse por la rejilla y los colores con exactitud para que nos casen perfectamente las «costuras» después, al crear la ropa.

In the picture I colored red to appreciate this selection. It is very important for the grid and quiarse colors accurately so that we match perfectly the «sewings» then to create clothing.
Realizar un canal alfa. Making alpha channels

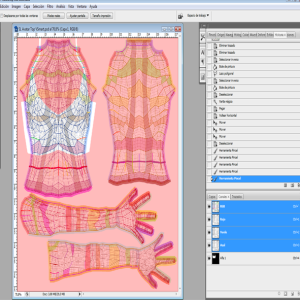
El segundo paso es crear un canal alfa. Esto lo realizamos en la pestaña de canales /channels. Llevar cuidado que en ocasiones estas plantillas traen por defecto canales alfa. A la hora de guardar y subir a SL, solo podemos tener el canal alfa que nos interese o saldrá la ropa con fallos. comos e aprecia en la foto a la derecha aparece el canal alfa. He activado los canales de color (RGB) para apreciar el canal, en realidad cuando lo creamos se ve en blanco y negro. Para crear un canal alfa basta guardar la selección realizada que nos interese, coloreándose ésta de blanco en el canal, y el resto negro.

Recordemos: Para Second life, un canal alfa lleva información de qué es opaco y qué es transparente o semi transparente en una textura. Lo que en el canal alfa es blanco, para SL es opaco, se verá dicha textura. Si en el alfa es negro, para SL es transparente. No veremos nada en esas zonas en SL. Los grises dan una escala de semi transparencias.

The second step is to create an alpha channel. This we did in the Channels folder. Take care that sometimes these templates have by default alpha channels. When you save and upload to SL, we can only have the alpha channel that interests us or leave your clothes with bugs. howto and see in the photo at right is the alpha channel. I enabled the color channels (RGB) to appreciate the channel, when we actually see in black and white. To create an alpha channel just save the selection that interests us, color is white for the selection area on the channel, and the rest black.

Remember: For Second Life, an alpha channel carries information which is opaque and which is transparent or semi transparent texture. What in the alpha channel is white, for SL is opaque,  the texture will be seen in SL. If the alpha is black, for SL is transparent. We will not see anything in those areas in SL. The gray scale gives a semi transparent areas.

En nuestro ejemplo hemos coloreado finalmente la camiseta de un color beige, y su alfa está realizado en grises para obtener la camiseta semi transparente. Si queremos añadir realismo, debemos elaborar piezas del mismo color en otras capas (no canales), y trabajar las propiedades de cada capa nueva, dando relieve y contraste, incluso sombra paralela. En mi ejemplo puse un reborde de encaje en otra capa, y trabajé sus propiedades de capa.

In our example we finally colored a beige shirt, and its alpha is made of gray T-shirt for semi-transparent. If we add realism, we must develop the same color pieces in other layers (not channels), and work the properties of each new layer, giving relief and contrast, even shadow. In my example I put a border of lace on another layer, and worked its layer properties.
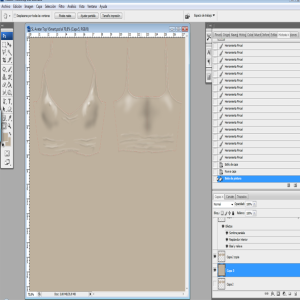
También añadí sombras y luces, lo que nos hace la impresión de arrugas. Como esta parte está extensamente desarrollada en un articulo de este blog, no explicaré aqui cómo se realizan. Si comentar un truco final (básico sobre todo para realizar tatuajes), consiste en rellenar la capa del mismo color de la camiseta, una vez elaborados todos los pasos. ¿Para qué realizamos esta operación? Photoshop tiene un margen de error en las selecciones. Este margen en Second Life es muy visible y nos puede dar los halos blancos. Sobre todo es penoso cuando las costuras se observan como líneas blancas. Por ello al texturizar el resto, nos ahorramos el problema del margen de error.

I also added shadows and light, which makes us the impression of wrinkles. This part is largely developed in an article of this blog, I will not explain here how to perform. If they make a final trick (basic especially for tattooing), is to fill the layer of the same color shirt once elaborated all the steps. Why we do this operation? Photoshop has a margin of error in the selections. This margin in Second Life is very visible and can give us white halos. It is especially painful when the seams are seen as white lines. Thus, by texturing the rest, we save the problem of the margin of error.

Recordemos eliminar resto de capas y canales que no necesitamos antes de guardar definitivamente la textura realizada.

Rotos en pantalones. Recordatorio. Broken pants. Reminder

En la imagen vemos como utilizamos una textura que nos interesaba en una capa nueva en nuestra plantilla de pantalones. Como es inferior a lo que precisamos tenemos dos opciones: o agrandarlo mediante libre transformación, o copiar, pegar y unir varias veces la textura.

In the image we use a texture as we were interested in a new layer in our staff of pants. As is below what we need to have two options: either to enlarge it with the free processing, or copy, paste and collate multiple times the texture.

Elaboramos el roto. Consiste en una selección que eliminamos en el tejido pero a la vez transformamos en zona negra en nuestro canal alfa, ya que debe verse vacía, transparente en SL.

We make the break. It consists of a selection to remove the tissue but it also transformed into dark area in our alpha channel, as it must be empty, transparent in SL.
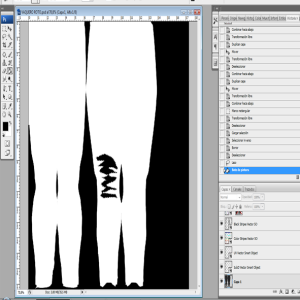
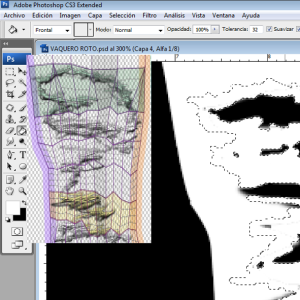
También tenemos un extenso artículo en este blog sobre realizar el efecto deshilachado. Tengamos en cuenta dos cosas: La primera que deberemos poner como blancas en el canal alfa a su vez las zonas con hilos, de lo contrario los hilos que atraviesen el roto no se verán en SL.

Segunda cosa, podemos generar sombras en el roto, lo que daría un aspecto totalmente real a nuestro roto en SL. Se generan mediante propiedades de capa en la capa del roto, una vez unidas las capas de tejido e hilos. Pero esta sombra también la tendremos que llevar al canal alfa, aunque en este caso en forma de grises.

We also have an extensive article on this blog about making the fraying effect. Consider two things: First that we put as white in the alpha channel in turn threaded areas, otherwise the threads that cross the broken will not be in SL.

Second thing, we can create shadows on the broken, which would look completely real to our broken into SL. Properties are generated by layer on layer of broken once the tissue layers together and thread. But this shadow also will have to take the alpha channel, although in this case in the form of gray.

REALIZANDO UNA PLANTILLA DE ARRUGAS A PARTIR DE UNA FOTO RL PREVIA. REALIZING A TEMPLATE FOR WRINKLES FROM A PREVIOUS PHOTO RL.

Este apartado es muy útil sobre todo para los que no se den maña con realizar las arrugas. Escogemos una imagen de internet o una foto realizada por nosotros donde veamos las arrugas realistas que queremos.  Recortamos la imagen, la adaptamos a nuestra plantilla (pegamos, y con las herramientas de transformación la adaptamos al top de la plantilla superior).

This section is especially useful for those who do not give skill to carry out the wrinkles. We choose an image from the Internet or a shot taken by us see where we want realistic wrinkles. Crop the image, we adapted to our staff (paste, and processing tools adapted to the top of the upper template ) .
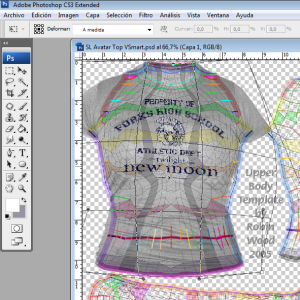
En este caso la imagen era gris, pero si no desaturamos antes de continuar (imagen-ajustes-desaturar).

Mediante pinceles, herramientas de clonar o parche corrector eliminamos logos y detalles que no sean básicamente las arrugas y las zonas de luces y sombras. En este paso puede que alguna zona pierda sus brillos o sus sombras. Por ello es básico conocer como se elaboran (vuelvo a remitir a dicho artículo).

In this case the image was gray, but if not desaturated before continuing (image-adjustments-desaturate).

Using brushes, tools to clone or patch fixes remove logos and details that are not basically the wrinkles and areas of light and shadow. In this step, some area may lose its shine or shade. Therefore it is essential to know how it is produced (refer back to that article).
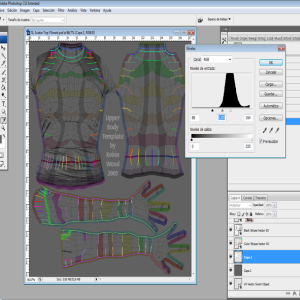
Ahora abrimos imagen-ajustes-niveles, y «forzamos» un poco los blancos y los negros, para que las arrugas se aprencien más. Creamos una capa inferior donde colocaremos el gris dominante en la capa de las arrugas y acoplamos.

Now open image-adjustments-levels, and «force» some whites and blacks, to more aprencien wrinkles. We created a place the bottom layer where the dominant gray layer of wrinkles and fittings.

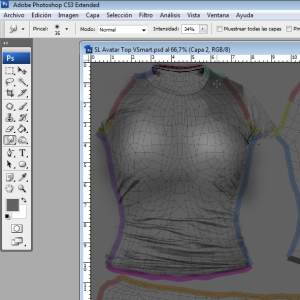
Nos debe quedar una capa gris medio donde se observen perfectamente las arrugas, aunque puede que tengamos que retocar otra vez zonas de luces y sombras. Esta es nuestra plantilla de arrugas.

¿Cómo usar esta plantilla?

Sencillamente se coloca la capa con el tejido sobre ella y trabajamos los modos de fusión con la plantilla de arrugas, para observar donde veremos mejor las arrugas. Generalmente se utiliza en modo fusión MULTIPLICAR, (en la capa del tejido).

We should be medium gray layer where wrinkles are observed perfectly, although we may have to tweak again highlight and shadow areas. This is our staff of wrinkles.

How to use this template?

Simply place the layer with the fabric over it and blend modes work with the staff of wrinkles, to see where we will see more wrinkles. Mostly used in Multiply blending mode (in the layer of fabric).
Silene Christen in Flickr

•septiembre 15, 2009 • Deja un comentario

Ya llega el momento de compratir mi book de trabajos. Darme tiempo  que iré poniendo todos.

Un saludo!!!

http://www.flickr.com/photos/silene_christen

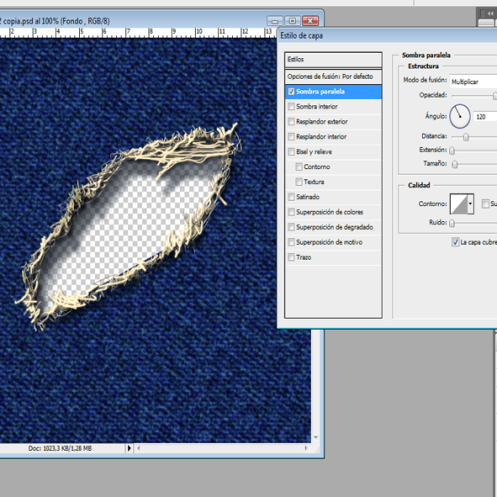
Rotos deshilachados en tela vaquera.Broken frayed denim clothing.

•septiembre 4, 2009 • 1 comentario

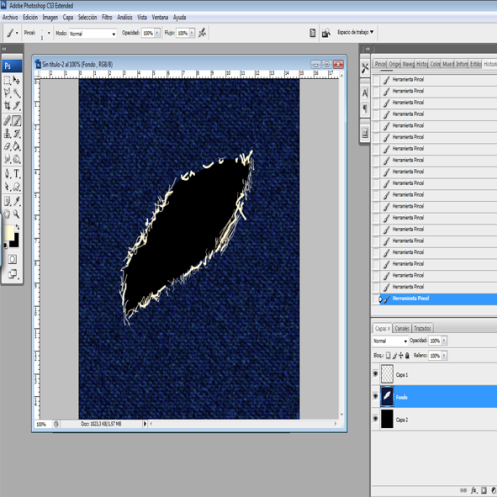
Primero tenemos la tela vaquera. Haremos los rotos eliminado la tela de los sitios donde queramos que vayan. Procuramos que queden vacios, sin textura, los rotos. Creamos una capa encima y de color blanco trazamos con pincel duro(básicos) y diametro mínimo varias lineas entrelazadas en los lados del roto. Podemos también hacer en la zona sin tejido. En mi caso utilicé 1, 3 y 4 de diámetro. Rodear todo el roto.

First we have the denim. We removed the broken fabric of the places where we want to go. We try to remain empty, without texture, broken. Create a layer on top and white paintbrush hard (basic ones) and minimum diameter several lines woven into the sides of the broken. We can also do in the area without tissue. In my case I used 1, 3 and 4 in diameter. Surrounding all broken.

deshilachados 1

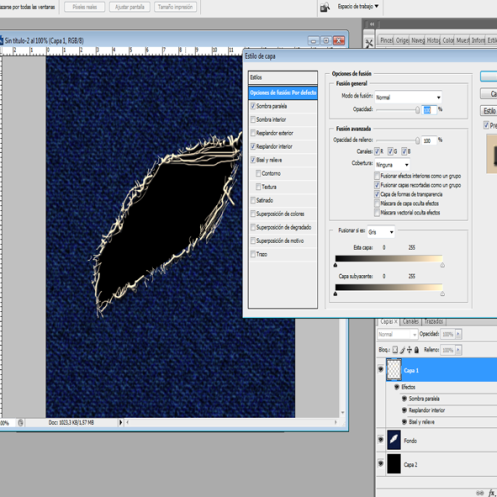
Después vamos a propiedades de capa y le damos bisel (bevel) y sombra paralela (drop outside shadow). Creamos otra capa y repetimos la operación con color gris esta vez, y realizamos menos «hilos». Aplicamos también propiedades de capa.

Then we  go to layer properties and put  bevel and outside drop shadow. Create another layer and repeat the operation with gray this time, and less «threads». We also apply layer properties.

deshilachados 2

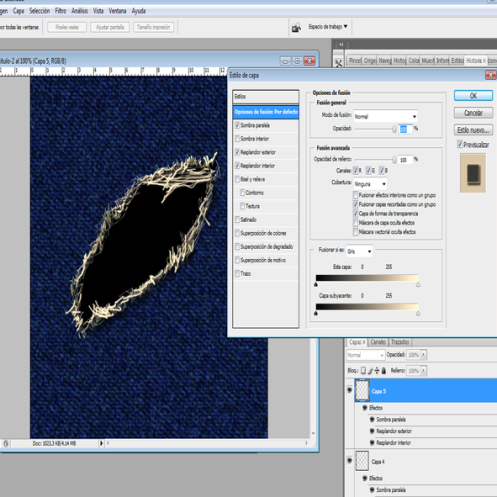
Creamos una nueva capa y pintamos algunos hilos en negro, y algunas zonas oscuras concretas. Aplicamos propiedades de capa. Volvemos a crear otra capa y daremos retoques con color blanco a los hilos más gruesos. Esta ya no es necesario aplicar propiedades de capa.

Create a new layer and paint some black threads, and some specific dark areas. We apply layer properties. We return to create another layer and tinkering with white give the thicker threads. This is no longer necessary to apply layer properties.

deshilachados 3

Recordemos que la parte interior tiene que estas sin textura. Para realizar el alfa, elijamos varita mágica no contiguos, y un valor de 10. Este sistema o el que explico en otro artículo sobre crear alfas rápidos es válido.

Remember that the inside is that these untextured. To make the alpha, choose non-contiguous wand, and a value of 10. This system or the one explained  in another article on creating fast alphas is valid.

deshilachados 4

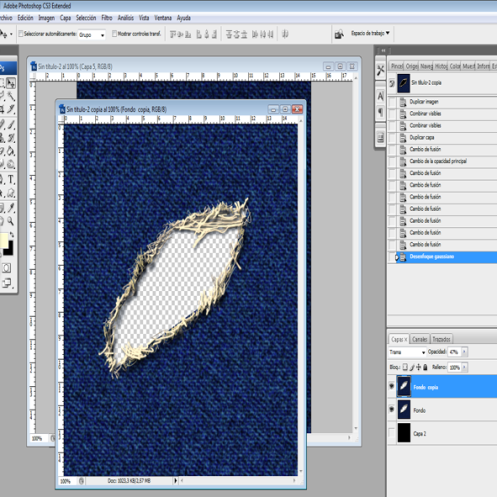
Conclusión: cuantas mas capas hagamos de fibras o hilos, y más estemos al detalle, mejor nos quedará el deshilachado. Esto vale también para bajos de pantalones. En el ejemplo de la foto una vez acopladas las capas visibles, dupliqué la capa y jugué con el modo de fusión. Esto nos puede dar otros tonos a la tela vaquera y al deshilachado interesantes (en mi caso utilicé opción trama).

¿Y si quieres hacer una sombra en la parte interior del roto?

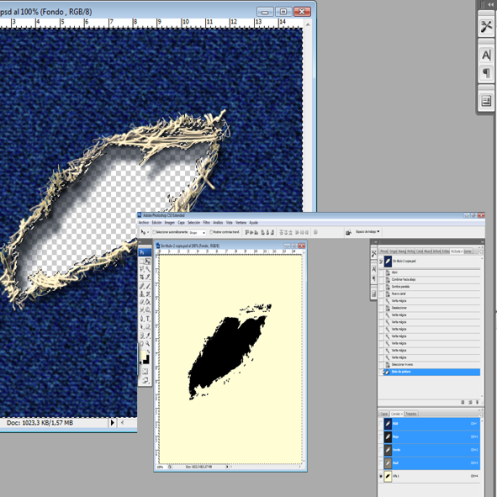
Recordar que el negro de una canal alfa para second life es transparente, el blanco no transparente Y EL GRIS ES SEMITRANSPARENTE. Por ello primero realizamos el canal alfa con todo el hueco del roto, como si no tuvieramos sombra. Incluso seleccionamos las sombras como si fueran zonas transparentes.

Conclusion: do many more layers of fibers or threads, and more we are to detail, the better we will be frayed. This also applies to low pants. In the example in the attached photo after the visible layers, duplicate the layer and played with the blending mode. This can give us other tones to the frayed denim and interesting effects (in my case I used screen option).

What if you want to make a shadow on the inside of the broken?

Remember that black alpha channel to a second life is transparent, non-transparent white and gray is semitransparent. So first make the alpha channel with all the broken hollow, as if we did not have shade. Even select the shadows as if they were transparent areas.

sombras en el roto1

Estas sombras las haremos antes o después de éste paso sencillamente con drop shadow o sombra paralela.

These shadows an be done before or after this step simply with drop shadow or parallel shadow.

sombras en el roto2

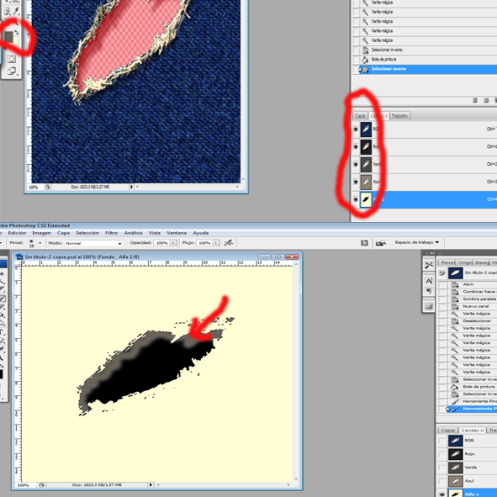
Como vemos, el alfa inicial no contempla las zonas de sombras. Después seleccionado todo el espacio negro del alfa, activamos tanto el alfa como los canales de color, veremos pues todo el roto en rojo oscuro.

As we see, the initial alpha does not cover the shadow areas. After all the black space selected alpha, activate both the alpha and color channels, we see it all broken in dark red.

sombras en el roto3


Y ahora, esto es importante, con el aerógrafo y color frontal GRIS, pintamos en el roto sobre las sombras solamente. Mi consejo, pasar solo una vez el pincel, ya que si hacemos varias pasadas el canal se estará pintando de negro. Ah! Estamos pintando en el canal alfa aunque veamos las capas en nuestra pantalla, aseguraros de eso. El resultado será aproximadamente el que veis en la imagen. Al hacer el formato TAG y subirlo a SL, esta parte se verá semitransparente, coincidiendo con lasombra semitransparente de nuetra imagen.

And now, this is important, and airbrushed with the foreground color GRAY, paint in the shadows only. My advice, move the brush only once, because if we do several passes the channel will be painted black. Ah! We paint in the alpha channel even though we see the layers in our screen, assure you of that. This brings about what you see in the picture. In making the TAG format and upload it to SL, this part will be semitransparent, coinciding with the  semitransparent shadow of our image.

Espero que os sea útil.

Silene Christen.

Textura de tela vaquera. Como hacerla / Jeans texture.How to make it

•septiembre 4, 2009 • 2 comentarios

El proximo artículo es como hacer rotos y deshilachados en pantalones vaqueros por lo que empecemos por crear la textura.

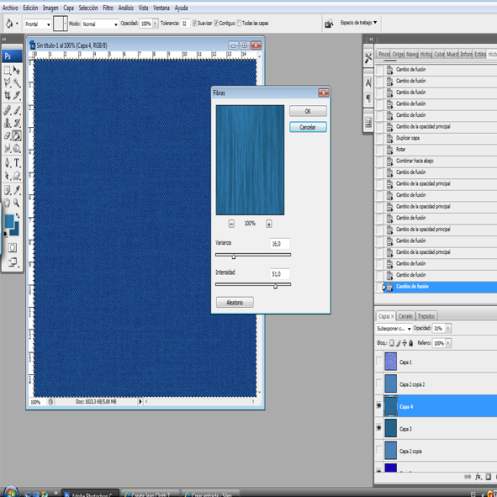
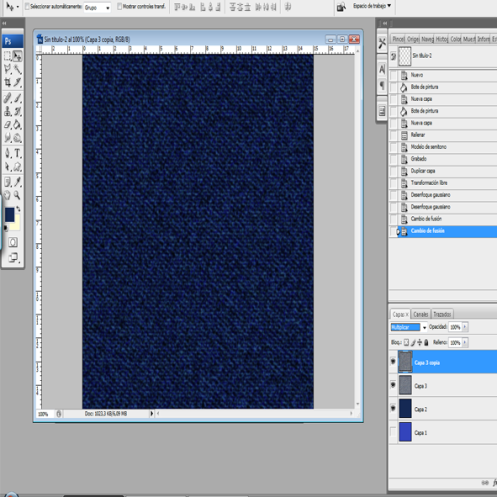
Elegimos un azul base. En mi caso R 51  G158  B219. Rellenamos la capa. Aplicamos Filtro- bosquejar – modelo semitono-puntos. El tamaño mínimo y contraste según resolución del lienzo (yo use 16). Después aplico Estilizar-difusión-solo oscurecer. Para lograr efecto desgastado, primero me aseguro de tener el color frontal y de fondo de la gama de azules, uno más claro que el otro. Relleno otra capa de azul y le doy a interpretar-fibras- 16 varianza y 51 intensidad. Copio esta capa y roto la copia 90 grados y combino en modo trama con la de abajo. Obtengo así una segunda capa que según mezcle con mi textura vaquera me da fibras y tonos mas oscuros (oscurecer) o claros (luz suave, luz intensa) etc.

tejido vaquero

The next article is like broken and frayed in jeans as we begin to create the texture.

We chose a blue base. In my case R51 G158 B219. Fill the layer. Apply Filter-sketch – halftone pattern-dots. The minimum size and contrast as resolution of the canvas (I use 16). Then apply Stylize-diffusion-only dark. To achieve Delave, first make sure I have the foreground and background color of the range of blue, one lighter than the other. Fill another layer of blue and I give interpret-fibers-16 intensity variance and 51. Copy this layer and breaking the 90 degrees and combine coipa mode with the lower plot. I get a second layer so as to mix with my denim texture gives me fiber and darker tones (dark) or light (soft light, bright light) and so on.

Otro metodo para hacer tela vaquera:
Capa inferior de un azul oscuro. Sobre ella dos capas, que en EDITAR-RELLENO-50%GREY rellenamos ambas. Una giraremos la textura unos 45 grados. Sometemos a estas dos capas a: Filtro- bosquejar-modelo semitono-lineas. Y después filtro-pixelizar- grabado o mesozoico. Desenfocamos ambas con el gaussian blur, y las combinamos con la de abajo (la que teníamos azul oscuro) de manera diferente. Una luz suave y la otra multiplicar.
Another method for denim/jeans:
Layer bottom of a dark blue. On it two layers, which in EDIT-FILL-50% GRAY fill both. A texture we turn about 45 degrees. Subjected to these two layers: Filter-sketch-halftone-line model. And then filter-Pixelate-recorded or Mesozoic. Unfocused both with gaussian blur, and combined with the downstairs (which had dark blue) differently. Soft lighting and the other multiply.
tejido vaquero2

Espero que os sea útil. Mi consejo: que jugueis un poco con filtros y maneras de fusión. Play a little with filters and ways of blending layers.

Silene Christen

Texturas, loop rez y otras cosas que necesiteis

•septiembre 2, 2009 • Deja un comentario

Estan todas en la sede, este es el LM. Poco a poco voy poniendo scripts explicados y cosas que creo facilitarán vuestras actividades en SL.

They are all in the headquarters, this is the LM. I am slowly getting scripts and explained things that I think will facilitate your activities in SL.

http://slurl.com/secondlife/Commerce%20Island/248/163/21

El looprez (un programa de Ged Larsen). Usos en ropa, joyeria, etc../ Ged Larsen’s loop rezz, for skirts, jewels and so on

•agosto 16, 2009 • Deja un comentario

Uso del Loop rezz. By Silene Christen.
El looprezz es un script que permite repetir un objeto x veces alrededor de una elipse. En el script podemos definir la elipse (puede ser una circunferencia), y diferentes parámetros.
¿para que podemos utilizarlo? Para hacer faldas, collares, etc.. Todo lo que necesitemos se repita de manera simetrica y circular.
Para utilizarlo, ponemos el script en una esfera y reseteamos. Cuando clickeamos la esfera, nos saca un conjunto prims de manera uniforme. (Antes habremos metido el prim a repetir también en la esfera).
Veamos qué parámetros cambiar en el script:
-linea 28 en lugar de perla, el nombre del objeto a repetir.
– linea 29, numero de objetos que precisamos. Esto se puede calcular matemáticamente (a traves de cacular elipse con los radios, y del diametro prim), pero vamos, a ojo con una o dos pruebas sabremos numero que precisamos.
– linea 30 y 31, son radios de la elipse. Evidentemente:
           – a mas parecidos mas circular la elipse
           – a menos tamaño, menor elipse, por ej collares de cuello
            – a más diferentes, una elipse más alargada obtendremos.
– linea 32, es el angulo a un eje perpendicular al conjunto de prims. en el ejemplo 90º para un collar de cuello, 45 para faldas cortitas, 15 faldas muy largas. Esto es orientativo.
– linea 33, logra doblar la elipse, cmo si fuera una silla de montar. Es util para collares que ajusten a la forma del cuello.
– linea 34, da un giro al disponer los prims. Es menos utilizado.
– línea 35, nos coloca los objetos que forme a cierta distancia de la esfera. Aconsejo para faldas por ej, subir uno o dos metros en el eje z, para que si tenemos que borrar, no «pillemos» la esfera del loop. Los valores se corresponden a los tres ejes <x,y,z>.
El resto del script no se toca.
Espero que os sea util.

El script lo dejo en la sede.

http://slurl.com/secondlife/Commerce%20Island/240/160/22

Y este es el link para los que quieran calcular exactamente nunmero de prims por elipse, ya sabeis, esto os da elipse, sencillamente sabiendo el diametro del prim calculais los que precisais.

http://www.csgnetwork.com/circumellipse.html

Using Loop Rezz.
The looprezz is a script that allows an object to repeat x times around an ellipse. In the script we can define the ellipse (may be a circle) and different parameters.
What can we use it? To make skirts, collars, etc. .. All you need to be repeated on a symmetrical and circular.
To use, put the script in one sphere and reset. When clicked the sphere, it pull out a set PRIMS uniformly. (Before we got the prim to repeat in contents, in the sphere).
Let’s see what parameters to change in the script:
– Line 28,  instead of pearls, the name of the object to repeat.
– Line 29, number of objects that need. This can be calculated mathematically (through calculus ellipse with radios, and the diameter prim), but we’re going to eye with one or two tests we will know numbers required.
– Line 30 and 31, are radii of the ellipse. Obviously:
            – Similar to get more circular the ellipse
            – At least size, the smaller ellipse, eg, neck collars
             – More different, a more elongated ellipse get.
– Line 32, the corner is an axis perpendicular to the set of PRIMS, in the example 90 ° for a neck collar, short skirts cortitas for 45, 15 for long ones. This is indicative.
– Line 33, is able to bend the ellipse how it were a saddle. Is useful to collars that fit the shape of the neck.
– Line 34, gives a twist to have the PRIMS. It is less used.
– Line 35, we placed the objects forming at some distance from the sphere. Recommended for slopes eg, climbing one or two meters in the z-axis, so that if we have to erase, no «catch» the loop area. The values correspond to the three axes <x,y,z>.
The rest of the script is not touched.
I hope it will be useful. 

I leave the script at Life Art headquarters.

http://slurl.com/secondlife/Commerce%20Island/240/160/22

And this is the link for those who want to calculate exactly nunmero PRIMS by an ellipse, you know, this gives you an ellipse, simply knowing the diameter of the prim calculais which precisais.

http://www.csgnetwork.com/circumellipse.html

Como saber dónde «pintar» para una textura de sculpted o de otros objetos / How to know where to «paint» a texture for sculpted or other objects

•julio 30, 2009 • 3 comentarios

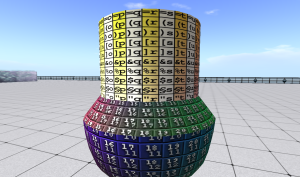
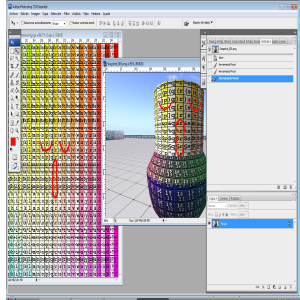
A veces queremos un detalle en una esfera, o pintar un objeto esculpted… con detalles. ¿Cómo saber dónde irá cada cosa el el objeto? Hay texturas numeradas para ello. La colocamos en el objeto o cara que queremos saber dónde pintar. Guiándonos por la cuadricula de numeros y letras y su orientación podemos localizar en nuestro lienzo de photoshop dónde dibujar/pintar. Como en las plantillas de SL, debemos tener éstas tanto en SL como en RL.

Sometimes we want a detail in one area, or paint an object esculpted … with details. How do I know where everything will be the object? Textures are numbered for this. The place or object in the face we want to know where to paint. Guided by the grid of numbers and letters and we can find guidance in our canvas photoshop where to draw / paint. As in the SL templates, they must have in SL as in RL.

En el ejemplo a torus/relieve/toroide, además cortado. Colocamos texturas en las caras que queramos decorar y con el photoshop abierto, vamos marcando por donde irá.

In the following example torus / highlight / toroid also cut off. Put textures on the faces you want to decorate and photoshop open, marking where we go.

Snapshot_003

Ah! Para los que no sepan como BAJAR TEXTURAS de SL a nuestro ordenador, es simple.
1. Tener la textura en el inventario
2. Que sea full perms
3. La abrimos que la veamos en nuestra pantalla, y vamos a la derecha opción: Archivo – guardar como
Así la tenemos en el ordenador sin hacer cosas raras como fotografiar, etc..
Después nos limitamos a relaizar un boceto en una capa dónde queremos que vaya algo, por ejemplo unos ojos y una boca, y ya en una capa nueva los realizariamos adecuadamente.
Que os sirva!
texturizar2
Ah! For those who do not know how the SL TEXTURES DOWNLOAD our computer is simple.
1. Having the texture in inventory
2. That is full perms
3. Then open it that you see in your screen, and go to the right option: File – Save as
Thus we have in the computer without doing weird stuff like photography, etc. ..
Then we just make a sketch in a layer where you want something, eg eyes and mouth, and a new layer we make it properly.
hope it’s useful for you!!
Silene Christen
PD. THE TEMPLATES, TEXTURES AND SO ON WILL BE SOON AT LIFE ART IN FRATTE AVAIABLE FOR ALL.
        LAS PLANTILLAS, TEXTURAS PARA COLOREAR, ETC ESTARÁN EN LIFE ART EN FRATE PARA TODOS PRONTO.

BASICO PARA HACER ROPA EN SECOND LIFE/ BASIC TO MAKE CLOTH IN SECOND LIFE

•julio 30, 2009 • 3 comentarios

Para los que empiecen de cero, o los que han tenido fallos, voy a dar unas nociones basicas y trucos de lo que he aprendido a base de fallos ;))

Las templates o patrones para realizarlas estan en muchas webs, pongo algunas:

http://secondlife.com/community/templates.php    Las originales de SL. Conviene tener todo el conjunto. Tienen también para hacer los ojos, aunque aviso que en sl los ojos giran 90º  al colocarselos al avi, es decir, hay que subirlos girados acw, para que al girarlos sl se vean bien en sl.

http://www.robinwood.com/Catalog/Technical/SL-Tuts/SLPages/AVUVTemplates.html  Unas de las más conocidas, lo más interesante es que estan en formato psd también.

For those who start from scratch or who have had failures, I will give some basics and tricks of what I have learned to base judgments;))

The templates or patterns are made in several websites, put a few:

The original http://secondlife.com/community/templates.php SL. It should be all set. They also have to make the eyes, but notice that the eyes rotated 90 sl st to avi placed, ie it must be rotated ACW upload, so that when girarlos look good in sl sl.

http://www.robinwood.com/Catalog/Technical/SL-Tuts/SLPages/AVUVTemplates.html One of the most popular, most interesting is that they are in psd format, too.

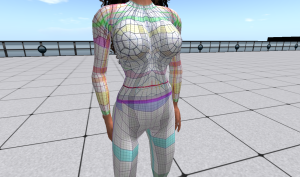
Bueno, una cosa interesante es no solo tener las plantillas en RL , si no en SL. ¿Por qué? Yo suelo tener en la carpeta clothing una ropa realizada con la textura de las plantillas. Esto permite ver exactamente dónde queremos que vaya un escote, una raja, un tatuaje. Eso es básico: Hay que seguir al pie de la letra las lineas de las plantillas. Es decir, comprobar que ajustan las de un top con un pantalón si forman una misma prenda, asegurarse de casar las lineas exactas a nivel de hombros,etc.  o se veran ropas mal unidas, tatoos que no casan adecuadamente, etc. Para los detalles de uniones o de cortes suelo estar con el avatar en SL vestido de plantilla y el photoshop abierto RL.

Well, one thing is interesting not only have the templates in RL, if not in SL. Why? I usually have in a folder clothing made with linen texture templates. This allows you to see exactly where we want to be a neckline, a slit, a tattoo. That is basic: You have to follow exactly the lines of the templates. That is, verify that the line of a top with a pair if they form a single garment, make sure the lines match the exact level of the shoulders, etc.. or clothes look bad together, tattoos that do not add up properly, etc.. For details of associations or soil cuttings with the avatar in SL clothing and temporary open photoshop RL.

Snapshot_001 

Las texturas a SL se deben subir en formato TAG o en PNG. Cuál usar en cada caso? Yo utilizo los PNG cuando no tengo transparencias ni tengo cortes precisos (cuellos, escotes, etc..). Por ejemplo, unos pantalones cuya cintura es arriba del todo o ajusto en SL. Para el resto, formato TAG es el ideal.

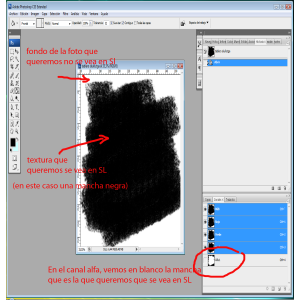
Que son los alfa? Se habla mucho en articulos sobre los alfa o canales alfa. En photoshop tenemos una carpeta (paleta, pestaña) llamada canales. Si tenemos nociones de photoshop conoceremos que estos canales controlan los diferentes colores con los que trabajamos, pero creando nuevos (que son a blanco y negro), se utilizan para selecciones que guardaremos permanentemente. La seleccion la podemos hacer en nuestro lienzo o foto y si damos a la opción guardar selección, se forma esta en un canal alfa (blanco y negro) en esta carpeta. También podemos directamente crear selecciones trabajando este canal. Sea cual sea la forma que utilicemos, al guardarla en el TAG y conservar el canal alfa, al subir la textura a SL lo que en este canal se vea blanco, en SL se verá bien. Lo que en dicho canal era negro, se verá transparente en SL.

Y las semitransparecias? Este canal admite escala de grises. Un gris más oscuro dará una textura más tranparente, y más claro, más opaca.

SL textures to be climbing in TAG or PNG format. Which to use in each case? I use the PNG transparencies or when I do not have precise cuts (collars, necklines, etc. ..). For example, trousers waist which is the top or adjustments in SL. For the rest, TAG is the ideal format.

Who are the alpha? There is much talk about the articles in alpha or alpha channels. We have a folder in photoshop (palette tab) called channels. If we have knowledge of photoshop will know that these channels control the colors that we work with, but creating new ones (which are black and white), teams that are used to keep permanently. The selection can make in our canvas or photo and if we keep the option selection, this is formed in an alpha channel (black and white) in this folder. We can also work directly to create this channel selections. Whatever the use, by saving in the TAG and keep the alpha channel by uploading the texture to SL so that this channel is white, will look good in SL. What in the channel was black, it will be transparent in SL.

And semi transparences? This channel supports grayscale. A darker gray will give a more transparent texture and more clear, more opaque.

canales alfa copia

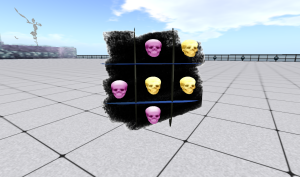
El resultado que veremos en SL es el siguiente (era una textura para el fondo de una obra de arte):

The result that we see in SL is as follows (it was a texture to the background of an art work):

Snapshot_002

Como vemos se ve la mancha negra y el resto transparente. En ropa es el mismo efecto. Debemos utilizarlo para mejorar cuellos, puños, cortes o rotos en ropa, escotes por delante o por detras, cinturas bajas en pantalones, pantalones cortos, etc..  Efectivamente, editandose el avatar en SL se pueden , por ej, cortar los pantalones, pero mediante selecciones propias y bordes trabajados tenemos la diferencia entre un pantalon de calidad y uno malo. Tambien recomiendo no «cortar» el tejido, con las selecciones es suficiente para que Sl las vea. ¿Motivo? que después no se vean lineas blancas en las uniones por el margen de error de la selección.

Otro detalle, para encajes o detalles, conviene que sean formas pequeñas, porque en SL, sobre el avatar se ven enormes.

Que os sean utiles estos consejos.

As we can see, it’s seen the black spot but the background is transparent. Clothing is the same effect. We must use it to improve collars, cuffs, cut or torn clothes, necklines in front or behind, low waists in pants, shorts, etc. .. Indeed, editing the avatar in SL can be, eg, cut pants, but by making own selections and working the borders  we have the difference between a quality pant and a bad one. I also recommend not «cut» the fabric, with selections is enough to be  seen in Sl. Reason ¿? to avoid white lines at unions because ot the margin of error of the selection.

Another trick to lace or little details, they should be small, because in SL, the avatar are enormous.

That these tips will be useful.

Silene Christen